
Hello Readers, I hope you are well.
This is a post I’m quite excited about. It’s a feature that was announced at Ignite in March last year as “Microsoft Teams Connect”. The term Teams Connect is still used, but it is more of a catch all for possibly a few features. The one I’m talking about is Shared Channels.
What are Shared Channels
Shared Channels are a new way to collaborate with internal and external users. Unlike adding a user as a member or a guest to an entire team, members are added to an individual channel within a team. Adding members to a single channel means you can invite internal or external users to access only that channel and nothing else in the team. Shared channels are great for a number of reasons.
One big one is that they can reduce team sprawl. You no longer need to create a new team just to share with an external user. You can add a shared channel to serve the same purpose and limit access to the same memberships that would have been done at the team.
But the biggest one for me is it could put an end to tenant switching for external guest access. And lets face it, who like switching tenants just to access a channel?
Microsoft has a doc on docs https://docs.microsoft.com/en-us/MicrosoftTeams/shared-channels. But stay here and I’ll tell you what you need to get going with it.
How to do it
To get started with Shared Channels you need a few things.
Enable and join public preview
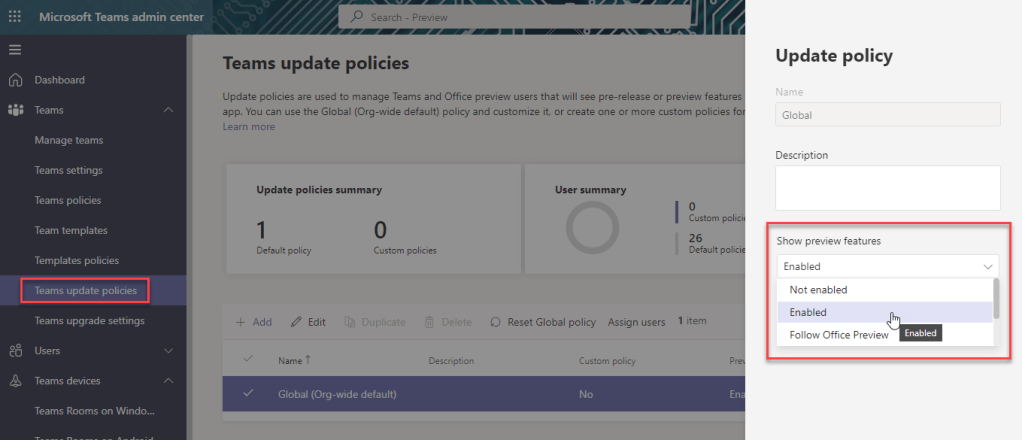
First, Shared Channels is in public preview. So if you want to use it, go join that first. Get your admin to modify the Teams update policy to allow preview features. Set the update policy to Enabled to show preview features. Either modify the global one or create and assign a new one so that select users can choose to join public preview.
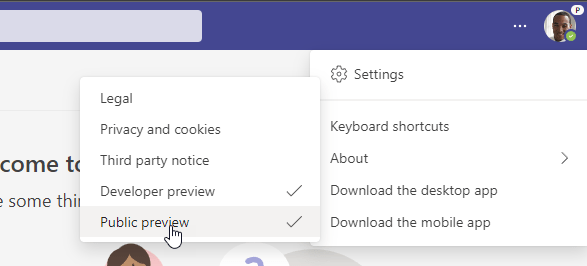
Now once the update policy is updated, in the Teams client for web or desktop, click on the … and under about, click Public Preview.
Allow Shared Channels
Next your admin will need to allow you to create shared channels. They need modify the Teams Policy to specifically allow users to create, invite others and join shared channels.
This is enabled by default in the global Teams policy. And that’s a good thing in my opinion. If you want to be more restrictive and selective with users, go ahead and create a new policy and assign it only to the users who are allowed to interact with shared channels.
There are three attributes to control what can be done with shared channels
- Create shared channels is as it says, it allows users to create the shared channels in the first place. I think if you are going to be restrictive and selective, do it here. If you don’t want every user to be able to create a new shared channel, create a new policy with just that enabled, and disable it in global.
- Invite external users to shared channels is self explanatory as well. Maybe you want someone else to create shared channels, but you can empower users to invite external users to the party.
- Join external shared channels. It’s no fun unless users can join someone else’s sharded channel. So enable this.
Again these should be enabled already. But if these have been disabled, go enable them now.

Enable B2B Direct Connect
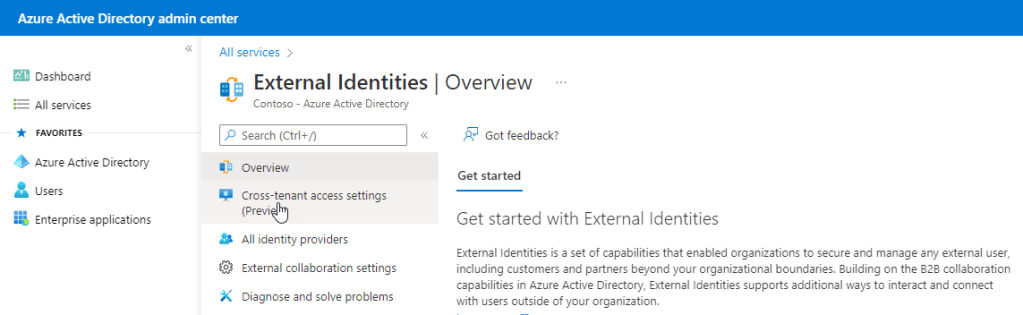
The ability to share shared channels externally is enabled in Teams by default. But to actually invite external parties, you need to be allowed to add external organizations. This is known as cross-tenant access, and the default is to block all external organisations. Enable Azure B2B Direct Connect inbound and outbound is really straightforward thanks to a new Cross tenant access preview portal in Azure AD.
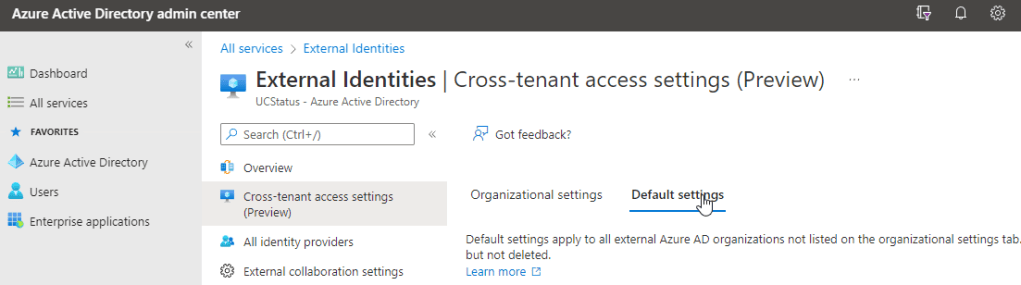
Go to Azure AD as an admin (Global administrator or Security administrator) and click on All services

Now click on External Identities

and Cross tenant access settings (preview)
Now click Default Settings
Edit Inbound Settings

B2B Direct Connect tab – external users and groups – allow access

Applications -> Tick all applications
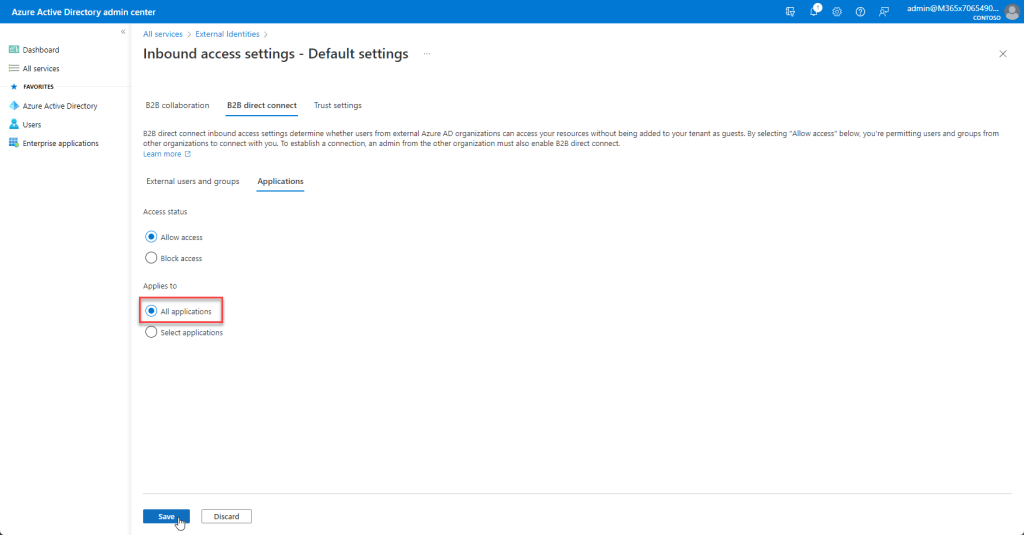
- if you’re worried that you’re opening up everything, fear not. All applications only refers to Office 365. You can see this if you choose select applications

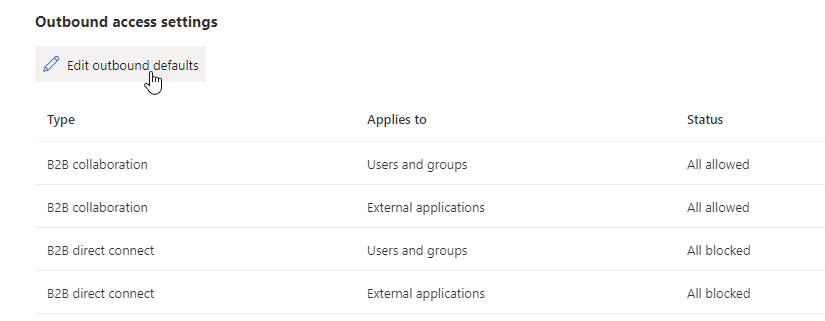
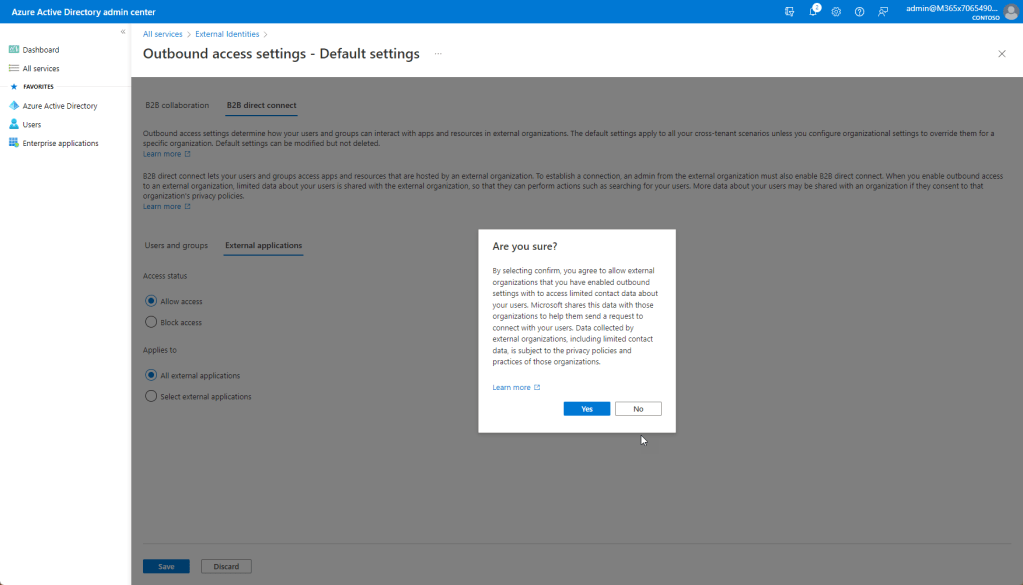
Now repeat for outbound
B2B Direct Connect tab -> users and groups -> Tick allow access

External Applications -> allow access and all external applications

Click yes to confirm
after clicking save you should see that the cross tenant access settings were successfully updated

You can also make changed to trust settings if you want to trust multi-factor authentication, compliant devices, or hybrid Azure AD joined devices from other organizations. I’ve kept it high level here. But configure what you want here.
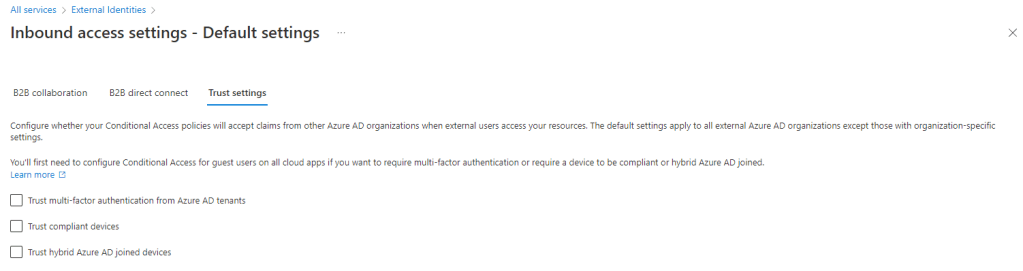
Open or all or selective orgs
Now you must decide if you want to allow shared channels with all external orgs or if you want to be selective. This works the same way as federation. If you allow federation in Teams, and you don’t add a domain to the allow list, you’re open federated and any external org can chat with you and see your presence. If you want to restrict it to specific domains, you add their domain to a list.
Click the Organizational Settings tab -> Click add organization
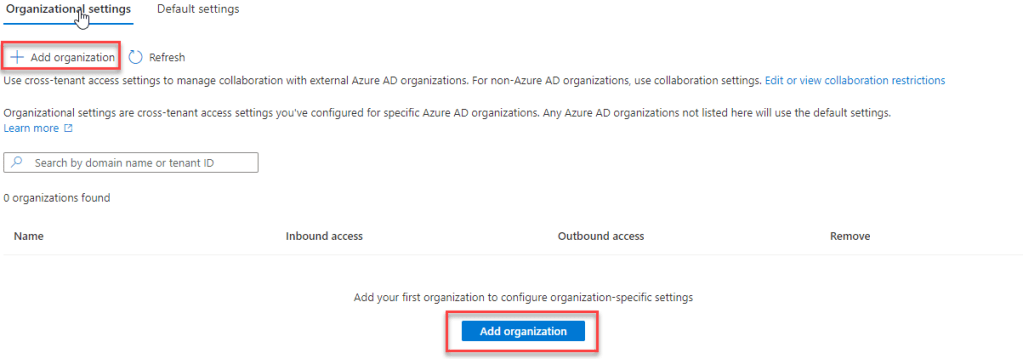
Search for the tenant ID or domain name. TIP: add the domain name and hit enter to search. It should find the domain name and tenant ID. Now click add to add that org.

Keep in mind that by adding one org, you’re now closed for B2B direct access. You have to add domains one at a time to allow users to add their users to shared channels or be added to theirs. I’m in favour of being open. Just like federation. Shared channels is a good thing. Trust me. You’ll want this. And so will your users. Shared channels is basically the death of tenant switching.
Anyway, now wait 2 hours for the settings to bake.

In my experience 2 hours wasn’t enough. I had to wait for two things to bake I guess. The first is that mine was a brand new tenant that wasn’t yet enabled for Public Preview. So it took a little while for me to see the ability to join Public Preview in the client. Once I saw the button in the menu -> About -> Public Preview I knew I would be able to set up a shared channel.
The second was probably already done before the previous.
Now start playing with Shared Channels. Keep in mind that you need a volunteer org that has all the above enabled too. In my case I’m using my personal tenant which is already set up correctly. And a customer experience tenant in the general ring which I set up as above.
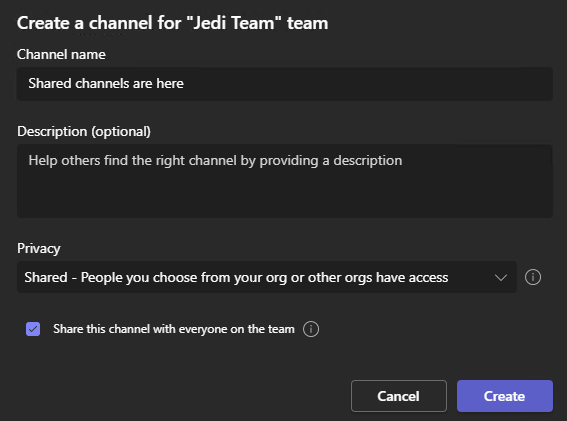
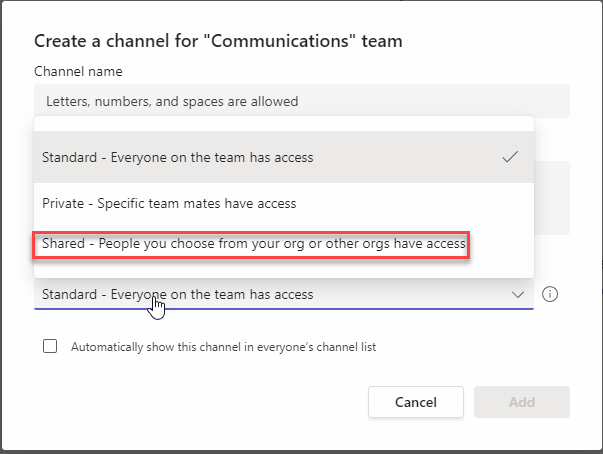
I created a new team in the CX tenant just to use for sharing. But I could have added a shared channel to an existing team. Just add a channel in the normal way.
In the drop down you’ll see a choice for the channel. Standard, Private or Shared. Choose Shared
There’s also a tick box underneath which allows you to share the new shared channel with all of the members of the team itself.
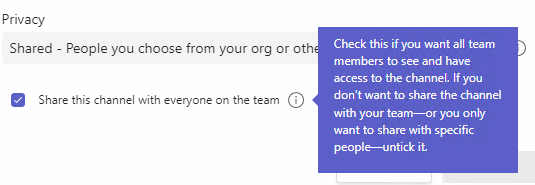
This tick box grants all existing and future members of the team access to the shared channel. This means that if a user isn’t a member of the team now, they won’t see the team or shared channel. But if you add them later, they will be able to see both. Useful for teams full of shared channels that all members are okay to access. Not so useful if you want a semi-private shared channel in a bigger team. If you tick this now you can remove that later on by going to manage shared channel, members and expand Teams. Then remove the team.
At this point you now have a shared channel. But it isn’t shared far and wide. You may have sharded it with the members of the team. Now you can share it further.
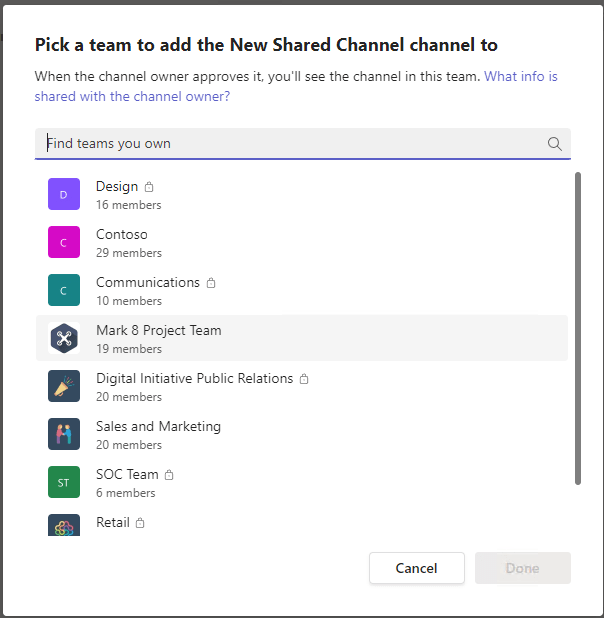
You can share a shared channel with people, a team or a team you own

If you share it with a team you own it lets you pick a team you own to add the channel to.

At this point it adds the shared channel to the team. And it grants all of the members of that team access to the shared channel.
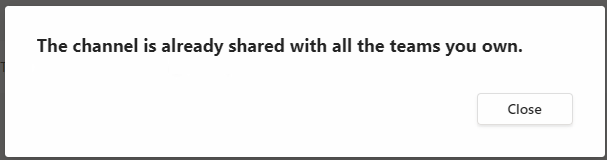
If you have already shared it with all the teams you own it will tell you
You can also share with the channel with a team you don’t own. You select a team owner and it send an invite to them. They can then choose a team they own and add the channel to it.
This makes the shared channel show up in that team and it grants access to all of the members of that team. Important to note that this doesn’t apply to guests. Only members and owners.
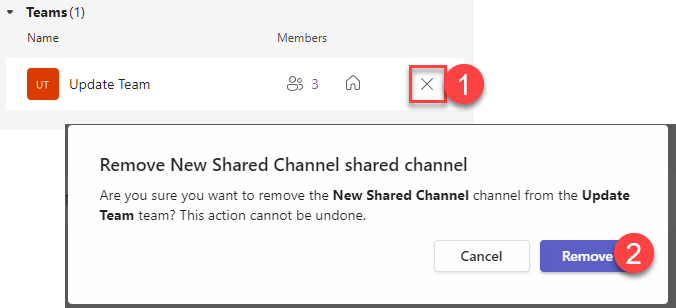
Remember, you can see all of the teams and therefore members that have been granted access to a shared channel by going to manage shared channel, members and expand Teams. And you can remove it if you no longer want to share that channel with the team or its members.

And lastly, you can share a channel with a person. This person (or people) can be internal or external. To share with external, you just need to enter their email address. And it gives them access.

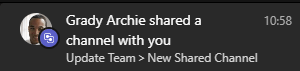
Now at this point I should say that shared channels don’t send an invite on email like guest channels do. At this point, the team header shows up in their team list. And the shared channel shows up underneath.

The really great thing is this channel shows up in their home tenant along with their own teams and channels. Which, if you haven’t guessed already, means they don’t have to switch to access it.
The external person will see an update in the activity feed.
And the first time they access the shared channel they need to accept a permissions request which is sent by the your org. This is standard. It is just some minimal permissions that B2B needs in order to grant access to the channel.

You can also accept invites to shared channels from other orgs. In my case I created a new shared channel in an existing team in my tenant. And I added the person from the CX tenant that added me to their shared channel. And the team name and channel showed up in the list.
What if you want to share multiple channels?
One thing you might be asking is what happens if you want to share multiple channels. For Teams guest access, you can make an external user a member of a team, which grants them access to all of the standard (non-private and non-shared) channels in that team, including general. They still need to switch though. I said above you can grant access to a shared channel to all members of a team. I also said this doesn’t apply to guests. So this isn’t a shortcut to grant quests access to all shared channels. Which is a good thing.
If you want to grant someone access to multiple shared channels in a team, you need to share each one with them. When an external user is added to multiple shared channels in a team, it just appears to them as multiple channels under the team header.

This could be useful if you want to share multiple channels with a customer to cover multiple topics. Maybe you’re working on multiple projects and each project has its own container channel.
What happens if you want to revoke access to a shared channel?
Simple. Go to manage channel, expand members and you’ll see them listed along with their org. Just click the cross on the far right to remove them.

What can you do in shared channels
You can have conversations in posts,

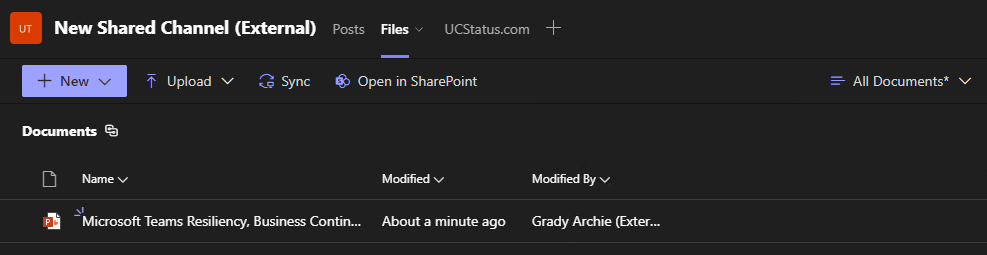
upload and access files
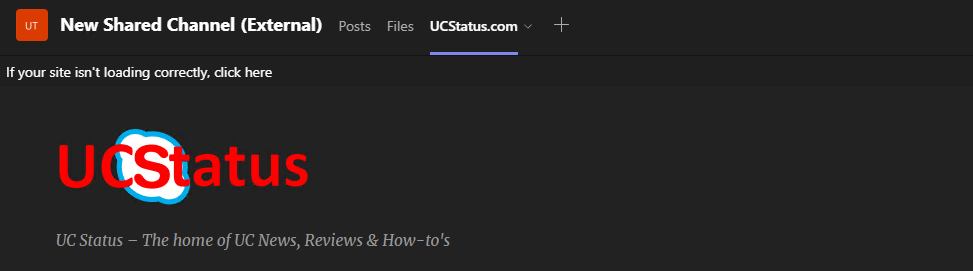
and even tabs
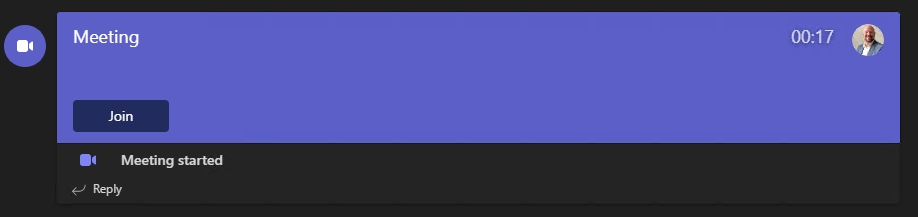
And you can even join meetings in the channel
What about control of settings?
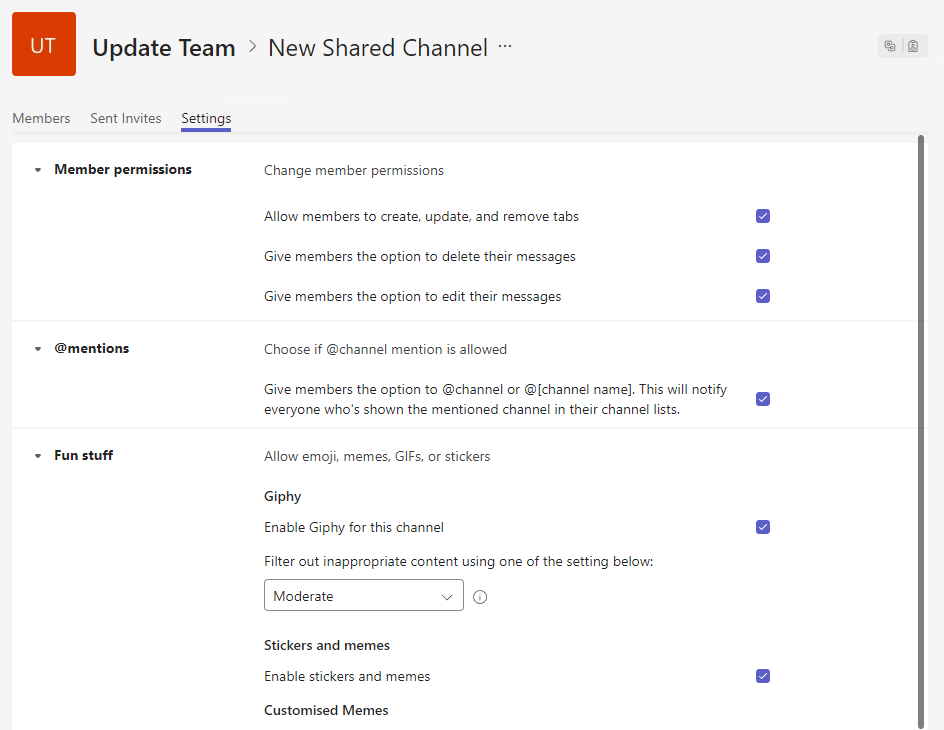
Team and channel owners get the same controls and settings of any channel
So what’s not to love about Sharded Channels?
I can’t think of anything. It really is that feature you’ve been waiting for. You get the same access as a guest would, but you don’t need to tenant switch. So much win!
What don’t you get in Shared Channels that you do if you use guest access to a team?
For one, chat in the other tenant. With guest access you switch tenants and can chat with users in that tenant. But the chats themselves remain in that tenant. As soon as you switch back, you don’t get to see those chats. You can still potentially chat with people, but you’d rely on federation for that to work.
Access to the general channel. Not a showstopper in my opinion
I’m sure there’s more hidden in the documentation somewhere, but those are what I can think of for now. If you have any that you know and think are important, leave a comment.
Documentation
For such a huge feature that’s taken the best part of a year to release to preview, you can expect there to be a bunch of documentation. This documentation goes through everything some of you will be asking. So I’ll just drop links to it all below so you have it in one place.
Overview
- Seamless external collaboration with Microsoft Teams Connect, shared channels – Events | Microsoft Docs
- https://techcommunity.microsoft.com/t5/microsoft-teams-blog/microsoft-teams-connect-shared-channels-is-rolling-out-to-public/ba-p/3252901
Message Center Post
Key links
- Shared channels in Microsoft Teams (Preview) – Microsoft Teams | Microsoft Docs
- Collaborate with external participants in a channel | Microsoft Docs
- B2B direct connect overview – Azure AD | Microsoft Docs
- Configure B2B collaboration cross-tenant access – Azure AD | Microsoft Docs
- Teams and SharePoint integration – SharePoint in Microsoft 365 | Microsoft Docs
- Sharing & permissions in the SharePoint modern experience – SharePoint in Microsoft 365 | Microsoft Doc
- Get context for your tab – Teams | Microsoft Docs
- Teams workflow in Advanced eDiscovery – Microsoft 365 Compliance | Microsoft Docs
- Search the audit log for events in Microsoft Teams – Microsoft Teams | Microsoft Docs
- Information barriers and shared channels (preview) – Microsoft Teams | Microsoft Docs
Search for everything Shared channels
End user documentation
- Create a shared channel in Teams
- Share a channel with people in Teams
- Share a channel with a team
- Why use a shared channel versus other channel types in Teams?
- Guests and shared channels in Teams
- Shared channel owner and member roles in Teams
And that’s all folks! Hope you enjoy the feature and I hope this has been useful.
Discover more from
Subscribe to get the latest posts sent to your email.
