

Hello readers, hope you’re well.
I love it when I find something super cool and super useful. When I saw this I just needed to get my hands on it to have a play. Now I get to tell you about it.
Background
I’ve been working in Microsoft UC since Office Communication Server (OCS) and along the way, one thing has remained a constant. Presence. Presence is how you let your colleagues and external contacts know what you’re doing and most importantly, whether you’re able to engage. Ever since MSN messenger and all through LCS, OCS, Lync and Skype for Business there was a term so ubiquitous that teh whole product was built around it. It was the Instant Message or IM. IM became a verb for the act of sending a message to someone in order to get a response. IMs were synchronous, meaning you send a message and almost expect an immeditate response. Presence was key to this.
Presence had a traffic light system. Green meant available (green means go) which meant you knew the person you wanted to IM was at their desk and actively working. They weren’t on a call or in a meeting. In a meeting or in a call or online meeting was red. Green meant they might be busy but not busy enough to not reply to something hopefully. You could send the IM and either get THE answer you wanted or a holding response. Other colours were yellow, for away, “be right back” or off work. Grey which meant offline or unknown, and red with a line through it was for “do not disturb”.
Change your presence status – Microsoft Support
There was an etiquet or code to the IM with presence. There was also a responsibility on both parties to honour that code.
You could update your presence simply with a few mouse clicks

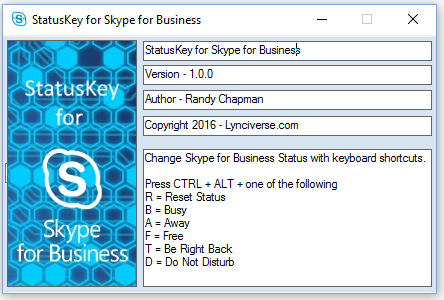
Or more simply with keyboard shortcuts
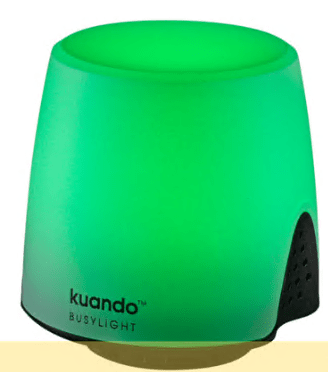
What about in person? I hear you say. Well there’s a solution for that too. The Busylight. There are a couple of brands who sell Presence Lights. Kuando Busylight is one I have been using for over a decade. I even wrote a Product Review for Kuando Busylight for Microsoft Lync almost 10 years ago. When I started working from home and finally had an office at home I installed a Busylight outside my office door and trained my family on the meaning of the colour codes. These were similar to Lync and Skype for Business, but with a couple of nice additions. Green was still free, yellow was still away/BRB, off was offline, solid red was in a scheduled meeting, but flashing red was in a call or online meeting using Lync/SfB and purple was Do not disturb.
The idea is you place a Busylight high up on your desk or divider so that people looking across the floor or walking by can see your presence at a glance without having to check the app. Flashing red was the universal sign for I’m not available to speak to you so come back later.
Such a simple but useful product.
What’s new?
Busylight is still going strong. They have a companion app that works with all the major UC applications.
What’s new is they have a new solution specifically for workspaces. Called Busylight Workspaces. Workspaces are either meeting rooms or desks.
A traditional Busylight relies on a USB connection top the users’ laptop and an app that interfaces with their UC applications in order to indicate presence. A desk, even without a laptop or person should still benefit from a presence indicator. Additionally, if a hot desk is booked but not occupied, a presence indicator can tell people who need a desk that they can’t use that desk. Same for a desk used by someone who doesn’t have their laptop.
What is Busylight Workspaces?
Busylight Workspaces is a collection of devices and an online portal/platform to glue them all together.
The platform is called Kuando IoT Portal. It is where you add things like gateways, PiR sensors and IoT versions of the Busylights.

Devices
The gateway. Which can be ethernet or celular based. Or both

The IoT presence light
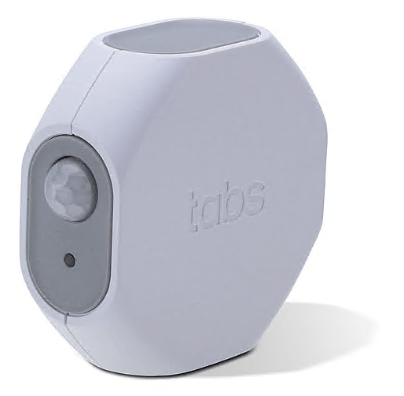
and the PiR motion sensor
All three of these are added to the IoT portal just for management.
LoRaWAN
They communicate in real time using a protocal called LoRaWAN. LoRaWAN is a Media Access Control (MAC) layer protocol built on top of LoRa modulation. It is the LoRa modulation operating on internationally reserved ISM sub-gigahertz bands, which is used by the devices to transmit messages in small chunks at great distances between devices and to the gateways. LoRaWAN is perfect for transmitting sensor data over long distances using AES-128 encryption. In fact, LoRaWAN gateways can send and receive signals over a distance of 3 km in an urben setting such as a town or campus, or 10 km in rural areas. This means a LoRaWAN network of devices can easily cover a multi floor building or campus of buildings. LoRaWAN end devices such as the PiR sensors and lights use such low power to send and receive data, a battery operated device can last up to 10 years on a single coin cell battery.
What are the use cases?
Since the lights aren’t tied to a compute device running an application, this opens up some additional possibilities. In my mind there are two. Meeting rooms or rooms of any type, and desks.
Rooms
Rooms can be split in two again.
Meeting Rooms are rooms used by one or more person to run meetings, either in-person or in video calls. Video calls can run from a dedicated room device such as a Microsoft Teams Room or on your laptop as a BYOD meeting.
Other rooms could be interview rooms at a police station, or consultation rooms at a hospital. It can also be broadcast studios at a radio station or one used by a podcaster.
Both room types can benefit from some kind of status indicator outside the room. For Microsoft Teams Rooms you can run Teams Panel on one of many devices from several OEMs. For instance, the Tap Scheduler from Logitech. Teams panels or similar act as a both a presence light and calendar display.

If you aren’t using Teams, there are many panel services and devices to choose from.
Sometimes you just want presence and a simple light. This is where Busylight Workspaces comes in. You can install an IoT presence light outside the door of the room whatever the type. All it needs is USB power. You can run it on mains using a USB power adapter or PoE to USB converter. This shouldn’t be too challenging in spaces with false ceilings or raised floors. Or in hard to reach places, a rechargeable power brick. I haven’t trried the latter so don’t know how long a brick might power a light. But an interesting experiement. Same with a small solar cell or solar powered power brick.
Desks
Desks can also use a presence light. Desks where there’s a PC or a docking station which connects to a laptop can use a regular Busylight which gets presence from the user PC/laptop running the Busylight app integrated into their UC tool. Of course these are only useful for employees running the app. What about hot desks used by 1st or 3rd party visitors or contractors? These desks can also benefit from a presence light.
Two ways to offer presence
As the title says, there are two ways Busylight Workspaces can control the presence on a presence light. By calendar or by proximity detection.
Calendar
The IoT platform can integrate with Microsoft 365 and Exchange Online using the Microsoft Graph API. The Graph API is used to access and synchronise the room and desk lists and their corresponding calendars. The list of required permissions can be seen here.

The M365 room/desk calendars are polled by an Azure function every minute to get their status. If the calendar is marked as busy, the Busylight which is linked to that calendar will turn from green to red.
You can see here in the portal a list of M365 rooms. One room called “Ten Forward MTR” is linked to a Busylight called “Light 1” which has a meeting in the calendar so it has been marked as busy. And the status you can see is red. I can also see the “light 1” Busylight and can confirm that it is indeed red.

Although this type of entity is called M365 Room it can also apply to a desk since Microsoft supports hot desking. Maybe an idea for Kuando/Plenom for the portal.
Presence
The other type or room is based on presence in or at the space. These spaces are non bookable where Plemon is concerned. Although there is nothing stoping you from making them bookable. The point is you can have a Busylight presence light that is linked to actual in-person presence. This is thanks to the PiR sensor.
You can see here in my portal that there is a what they call a flexible room (or desk) called “Office” which has a link to a sensor called “PiR Sensor” which is also linked to a Busylight called “Light 2”. And since I am in that office and moving about in front of the sensor, you can see the status of Office is red. I can also see the Busylight and it is indeed red.

A room that needs a presence based Busylight all you need to do is deploy the PiR sensor somewhere in the room that makes it certain that the room is occupied. The PiR sensor is very sensitive, which means if it sees someone it triggers the light immediately. So think about where you might deploy these. Rooms with glass walls could be challenging, so think about putting the sensor up high facing away from glass walls and open doors so it doesn’t capture people walking by. Now think about a long corridor of rooms, all with a Busylight outside of them. Just find the green light and the room is yours.
I’m using an image from the Busylight site here but you get the idea

Switching to desks. Again putting the sensor deep underneath the desk where someone’s legs migh sit could be a great way to give you presence based presence at a desk. Of course when walking by you can clearly see if someone is sitting at a desk. But from afar where there are high cubicles or dividers, or in private desk booths this could prove to be very useful in non-bookable scenarios. All you need to do to find a place to sit is scan the room and look for a green light, then head that way.
Setup
Setup is very easy. There’s a manual which I read and followed to walk me through everything I needed to know. You can find it on the landing page here kuando Room Occupancy Solution
I also found through clicking a link to some videos on how to make it all work here https://busylight.com/support/#flex-install.
To summarise, however
1. First sign in to the portal
open this website with your browser: https://iotportal.plenom.com/
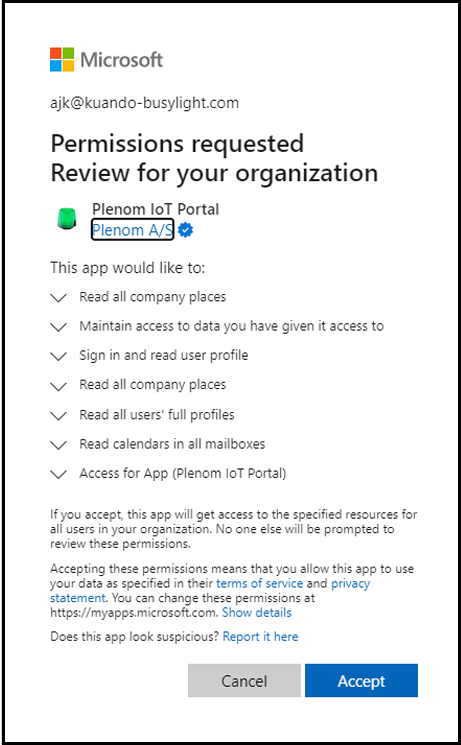
2. Log in with a Microsoft 365 admin account with the authority to give data consent
3. Accept consent for the kuando IoT Portal to access data
Once logged in you will see this page

4. Next give admin consent

5. and then register for the portal
Please select the appropriate default frequency
- EU countries = SF9 for RX2 (if no other information is given by Plenom)
- US = FSB 1 (if no other information is given by Plenom)
- ASIA = AS 923 Group1 (if no other information is given by Plenom)
And click Save

6. At this point you need to wait for a portal admin at Plenom to enable the account. They say this takes about a day.
7. After your account has been enabled you have to add a gateway. Make sure the gateway is powered and connected to the LAN and has internet access.

The details you need will be in the information you received with the equipment and on a sticker on the box. What you need is the 16 digit Device EUI and a name. Then press save
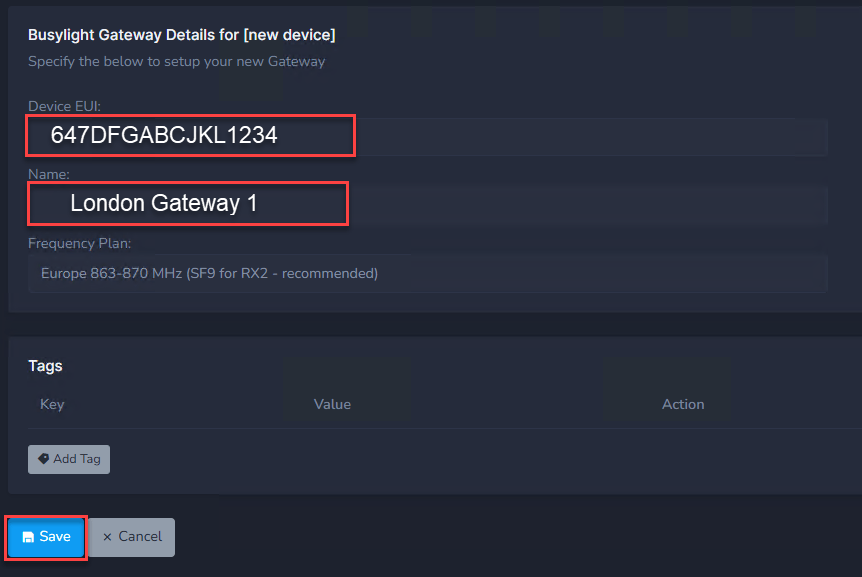
Once added you should see that the gateway shows as “connected”

8. Now add your lights
You need the device EUI, the name and frequency plan. The EUI can be found in the documentation or on a sticker on the light. Press save or save and add new, then repeat for all of the lights you have.

Once all the lights have been added you’ll see them in the portal. There won’t be a status until you configure how you want the light to get its presence.
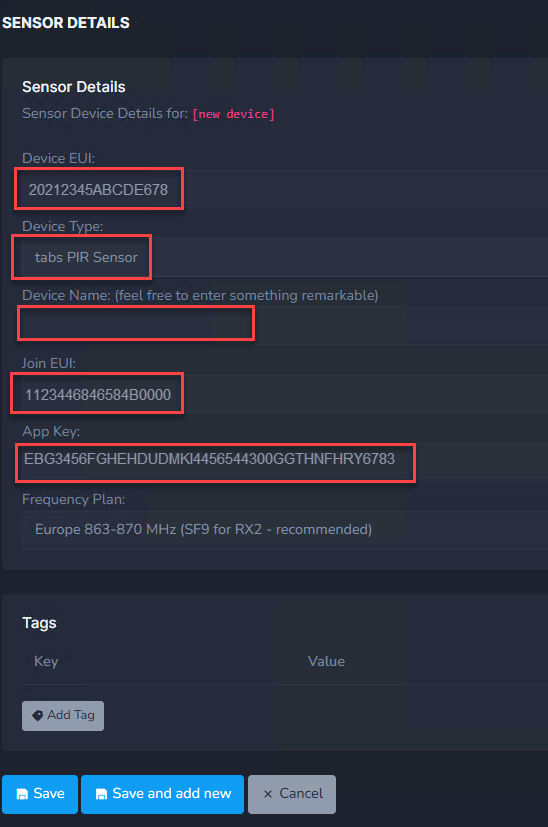
9. Now add sensors if you have them
The sensor data you need consists of the
- Device EUI (again, on a sticker or in the documentation.
- Set the type to Tabs PiR Sensor
- Give it a name
- You need a 16 digit “Join EUI” – in the documentation you receive from Plenom
- And a 32 digit “App Key” – in the documentation you receive from Plenom
Save or save and add new and repeat
10. Now you need to decide how you want to use the Busylights
For Flex spaces you simply add a new flex room or desk, give it a name and other details. Then select the light and sensor. This binds the light to the sensor which means if the sensor detects a person, the light will glow red. And of course it binds the light to the room or desk you set up.

For M365 spaces you need to map a Busylight to the room in your room list and click mapping to map a Busylight to that room mailbox. I think the room list is imported as part of the permissions

Choose one of the lights from your list and tick mapped, enabled and click save

You can map multiple lights to a single room which could be useful for rooms with multiple doors or entrances.
And that’s it. If you have a lot of gateways, lights and sensors you will have your work cut out for you. So get yourself a drink and some snacks and get stuck in. You might also need your own presence light to stop people bothering you.
Conclusion
You can tell I’m a fan of presence lights. I think they are very useful in an office setting. Having traditional USB presence lights only works when they are used one per user at a desk. They rely on software to make them light up. Busylight Workspace is for situations where you can’t rely on someone connecting a light to a laptop. You can’t install the software on a Teams Room, so that’s out too. Busylight Workspace is teh perfect lightweight solution for providing presence lights outside rooms or on desks where you have to rely on either proximity detection or what’s in the calendar to indicate the presence of the space.
Disclaimer
This isn’t a paid promotion of Kuando, Plenom or Busylight. I genuinely thought this was an interesting technology and asked them if I could have a play with it. I also thought it could be useful to you the reader and my community. I’d like to thank Oli at Plenom for loaning me the gatyway, lights and sensor and granting me access to the solution to have a play. And for the support to get me going and to fix an issue when I got stuck.
Further resources
- Plenom Busylight Workspaces Landing page
- Busylight Workspaces Landing Page
- Shop Busylight WorkSpaces
- Install guides and FAQ
- Flex Portal User Guide
- M365 portal user guide
- Kuando IoT portal home
Discover more from
Subscribe to get the latest posts sent to your email.

[like] Karlsen, Kjetil reacted to your message:
LikeLike