

Hello Readers, I hope you’re well.
This is the 3rd part of a series on the New Auto Attendants and Call Queues. Part 1 was an introduction and talked about the changes as they moved from the Skype for Business Admin Centre to the Teams Admin Centre. Part 2 described how to set them up using the Teams Admin Centre.
In this part, I go a little deeper and show you what’s possible with PowerShell. Specifically, the Skype for Business Online PowerShell module.
Background
Like all Microsoft products, there is only so much you can do in the UI or Control panel. For everything else, you need PowerShell. The reason is simple. There’s often just too much to include in the UI. Obscure things that most will never touch. For those things, you turn to a PowerShell module that gives admins access to the basic things that you can do in the, plus the ability to fine tune and adjust things.
You can even set things up from scratch using the module and never have to use the UI.
This is a big subject which deserves some attention. So I’m going to break this up into a mini series of its own.
- Part 3a – The Basics (this post)
- Part 3b – Make changes to an existing Auto Attendant or Call Queue
- Part 3c – Create a new Auto Attendant and Call Queue
- Part 3d – Extras
What do you need to get started?
First, you need the Skype for Business Online PowerShell module. Unlike other modules, you need to download this module on your PC.
Supported Operating System
- Windows 7 64-bit, Windows 8 64-bit, Windows 8.1 64-bit, Windows Server 2008 R2, Window Server 2012, Window Server 2012 R2, Windows Server 2016
Prerequisites
- Windows PowerShell 5.1 – See this link for download details.
Install the module
Download the SkypeOnlinePowershell.exe file and double click to start the “install”. Then just follow the instructions on the screen to complete the installation.
The setup program copies the Skype for Business Online Connector module (SkypeOnlineConnector.psd1) to your computer. in “C:\Program Files\Common Files\Skype for Business Online\Modules\SkypeOnlineConnector”.
Now you just need to import the module so you can invoke it whenever you want. Just run the following in an elevated PowerShell window:
Import-Module SkypeOnlineConnector
You only need to do this once.
Connect to Skype for Business Online
Run the following in an elevated PowerShell window:
$sfbSession = New-CsOnlineSession
Import-PSSession $sfbSession
This will prompt you for the user principal name. Enter the name and hit enter. This will prompt you for the password. Enter the password and click sign in.

This will open a session

What can you do
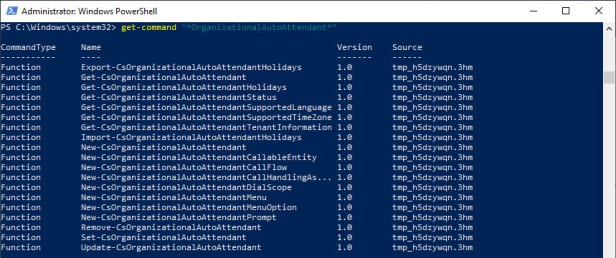
Now you can find all the commands available by doing a search using the Get-Command cmdlet.
Get-Command “*autoattendant*”

As you can see there is a lot of cmdlets available for Auto Attendants. Fortunately, not all are necessary.
You know Microsoft likes to change names of things. When Microsoft first launched the feature in Skype for Business Online, they were called Organizational Auto Attendants. No idea why. These were the “Generation 1” of the Auto Attendants in Skype Online.
Don’t believe me? This is a little advanced for this post, but I’m going to attempt to create a basic Gen 1 Auto Attendant using the Gen 1 command. I promise I will explain what all this means Part 3.
For now, just run the following:
$GreetingPrompt = New-CsAutoAttendantPrompt -TextToSpeechPrompt “This is the old way of creating an Auto Attendant”
$automaticMenuOption = New-CsAutoAttendantMenuOption -Action Disconnect -DtmfResponse Automatic
$Menu=New-CsAutoAttendantMenu -Name “Old menu” -MenuOptions @($automaticMenuOption)
$CallFlow = New-CsAutoAttendantCallFlow -Name “Old call flow” -Greetings @($GreetingPrompt) -Menu $Menu
New-CsOrganizationalAutoAttendant -Name “old way” -Language “en-US” -TimeZoneId “UTC” -DefaultCallFlow $CallFlow
You should get an error that reads “First generation provisioning is no longer supported. Please use the cmdlets which follow this format “*-CsAutoAttendant*” instead.”

All the commands with Organizational in the name are considered Generation 1.
I haven’t found any resources or posts from Microsoft to say anything about the changes. Hopefully, Microsoft will get rid of them so there’s no confusion. For now, I submitted feedback on all of the docs pages for each cmdlet with Organizational in the name.

Now if you only search for CSAutoAttendant. You can see there is a much shorter list of Generation 2 cmdlets.

Fortunately, there’s no Generation 1 version of Call Queues. They remain unchanged.
Get-Command “*callqueue*”

Verbs
Powershell commands (or cmdlets) are made up of two parts. The Verb and the Noun. PowerShell uses a “verb-noun” naming system. Each cmdlet name consists of a standard verb, hyphenated with a specific noun. PowerShell verbs express specific actions in PowerShell.
I know this is really basic for this post, but thought it was a good idea anyway.
- You use the New verb to create a new AA or CQ
- The Set verb to change or add something to an existing AA or CQ
- You use Get to see what’s already been created
- And Remove to get rid of one
- Import and Export are only related to Holidays
- Update is used to force an update of resources associated with an AA. Currently, it repairs the Dial-by-Name recognition status of an auto attendant. More info
Nouns
CsAutoAttendantCallableEntity
CsAutoAttendantCallFlow
CsAutoAttendantCallHandlingAssociation
CsAutoAttendantDialScope
CsAutoAttendantMenu
CsAutoAttendantMenuOption
CsAutoAttendantPrompt
CsAutoAttendantHolidays
CsAutoAttendant
CallQueue
More on these later…
That’s it for now.
Stay tuned to Part 3b where I’ll show you how to make changes to an existing Auto Attendant or Call Queue using PowerShell.

Thanks for all of your articles. I’ve imported the module but I’m not getting any of the new Powershell commands. Have you seen this problem before?
LikeLike
I haven’t seen that. Usually as soon as you import the module and connect, the commands are available
LikeLike
Great article Randy, have you been able to setup the AA using the new Phone System – Virtual User yet? I have been having some issues assign a service number to the AA Resource Account, giving me a license issue regardless of having spare licenses available. have you seen this issue yet?
LikeLike
Thanks for the kind words.
You have to assign the resource account a license. Then you can assign a phone number.
Just keep in mind that you might still have to wait for the AA/CQ to work. Replication can take minutes, hours or days.
LikeLike
Great articles. When will you be releasing 3b on this subject?
LikeLike
Thank you. I’ve started it but it’s a huge subject. I’m going to say soon and leave it there
LikeLike
Thanks for the article Randy. I am trying to configure “transfer call to target” on a existing holiday within auto-attendant to automatically transfer the call to either a user or an applicationendpoint. I am able to create “CsAutoAttendantMenuOption” but having trouble associating it to an existing auto-attendant. Example would be like the one below:
$overflowObjectId = (Get-CsOnlineUser test18@123.com).ObjectId
$overflowEntity = New-CsAutoAttendantCallableEntity -Identity $overflowObjectId -Type User
$menuOption = New-CsAutoAttendantMenuOption -Action TransferCallToTarget -DtmfResponse Automatic -CallTarget $overflowEntity
$AA = Get-CsAutoAttendant -Identity xxxx-xxxx-xxxx-xxxx-xxxxxxx
$SCHEDULE = Get-CsOnlineSchedule -Id cxxxxxxxx-xxxx-xxxx-xxxx-xxxxx
I am lost on how to make it work. Appreciate if you could put me in the right direction
LikeLiked by 1 person
I’ll have a look at this tomorrow and see if I can get you where you need to be
LikeLike
Randy! I was able to figure it out.
LikeLike
Excellent. Great job
LikeLike
Can I have a copy of what you worked out? I am stuck at the same place.
LikeLike
HI @cgskreddy I am stuck at the same place. HOw do you associate the AA with the schedule and callflow of an AA identity? Please help!!
LikeLike
Excellent, learning a lot from your articles, is it possible to have a time out for a auto-attendant?
say if no option is pressed transfer to operator?
Thanks,
Kevin
LikeLike
Thanks Kevin. There isn’t an option as far as I know. But that would be good. One for UserVoice.
LikeLike
Excellent Post!!
Am trying to Setup business hours in AA using Powershell . do you know the steps..?
$autoAttendant = Get-CsAutoAttendant -Identity “11111111111111111111111111”
Set-CsAutoAttendant -Instance $autoAttendant
$workdayTimeRange = New-CsOnlineTimeRange -Start 09:00 -End 17:00
LikeLike
I’ll dig it out and respond
LikeLike
Is there a way to export out the existing audio recordings present on a teams auto attendant or call queue? I’ve been searching, but haven’t had much luck finding anything.
LikeLike
You mean one that you uploaded? I don’t think so. But I assume you have them since you uploaded them.
LikeLike
Not a very helpful reply. With SfB and Exchange UM, we had the ability to save &/or export out the audio files. My company has well over 100 SfB response groups that will need to be recreated in Teams. We also back these files up regularly, in case someone accidentally deletes something.
LikeLike
Sorry Stephen if that wasn’t helpful. I wasn’t suggesting you’d lost anything. Just saying that I don’t know of a way to get the information out to re-use it elsewhere or to back it up. Sounds like a suggestion for Uservoice?
LikeLike
Hi- did you ever get around to 3b? Trying to work out how to edit an existing call flow? (So I can automate update of menu options)
LikeLike
Hi Luke, I got as far as a draft and never picked it up again. Sorry
LikeLike
Hi Randy,
do you know how to make bulk changes to change business hours for all AA using script? if you can please suggest or guide that would be great.
Regards
Josh
LikeLike
I’d have to take it away and try it. But I’m fairly certain it would be possible
LikeLike