

Hello readers, hope you’re well.
This is a follow up to the previous post on the The New Auto Attendants & Call Queues and part of a short series. In this post I’ll show you how to create and configure a new Auto Attendant and a Call Queue.
What you’ll need
- You’ll need a licensed Resource Account with a phone number. The phone number can be a service number acquired from Microsoft (you’ll need at least one Calling Plan add-on license to acquire numbers) or assigned from Direct Routing. Direct Routing numbers only work for users in Teams Only mode.
- You’ll need to create at least one agent list for your call queue. This can be a security group or distribution list
- You’ll need some users who are Enterprise Voice enabled and licensed with E1 or E3 with the Phone System add-on or E5. Only EV enabled, licensed users can receive calls in a Call Queue or Auto Attendant.
How to do it
First Create a Call Queue
Open the Microsoft Teams Admin Centre, expand Voice and click on Call Queues. Click New Call Queue to begin

This opens the new call queue form

Add a resource account, enter the name of the resource account you want to associate with this call queue and click add

You can add more resource accounts if you want, or just click add, one more time

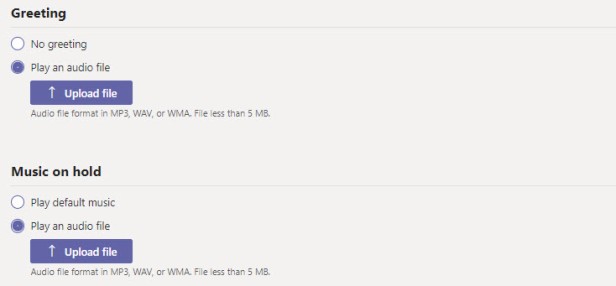
Now choose whether you want to add a greeting such as “Please hold the line for sales”. You can’t use text to speech here. If you do want a greeting you’ll need to upload a recording.
Now choose your Music on Hold. You can choose to leave it as the default, or you can upload your own.
Now add your call agents. This is the distribution group you created earlier. Click add call agents, enter the name of your group and click add

Add more groups if you want to, or click add, one more time

Now choose a routing method. Attendant, Serial or Round Robin (new)

and whether agents can opt out of taking calls and the alert time

Now configure call overflow handling. First decide on the maximum number of callers that can be in queue before another action is taken. You can disconnect the caller or redirect to a person or a voice app (another auto attendant or call queue).

As an example, I chose a person. Now configure call time out handling. Again, you can disconnect or redirect. Then click save to save your call queue.

Repeat for all of your call queues. Call queues can take calls directly or as a caller choice in an Auto Attendant.
Now Create your Auto Attendant
Again, open the TAC and expand voice and click on Auto Attendants. Choose a name for your auto attendant

Now add a resource account. This is probably where you’ll need a resource account with a telephone number. The telephone number can be a service number from Microsoft or sported in number (you’ll need a calling plan to acquire or port in numbers). Or you can use a number on your existing range on-premises (using Direct Routing). Or if you’re using a Direct Routing Service from a provider, they can assign a number from your range.
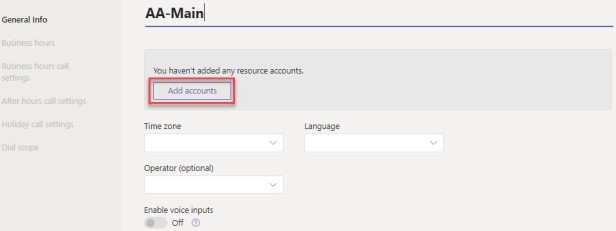
Search for and add your resource account


Now choose the timezone for this auto attendant

And the primary language

Now choose an operator if you have one. This can be a person or a voice app such as a call queue for your front of house staff
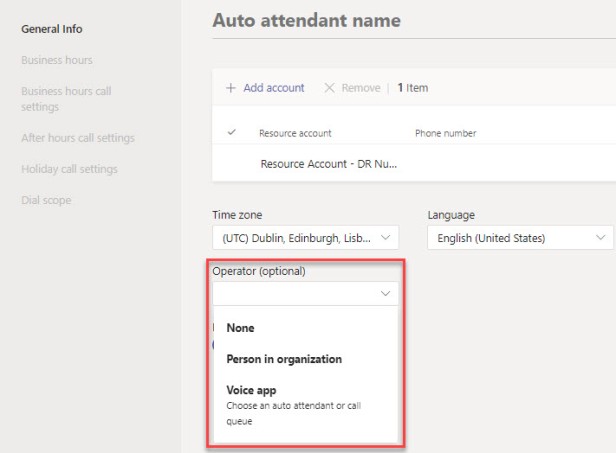
I selected person and assigned the role to Jim

Make sure enable voice input is on and press next

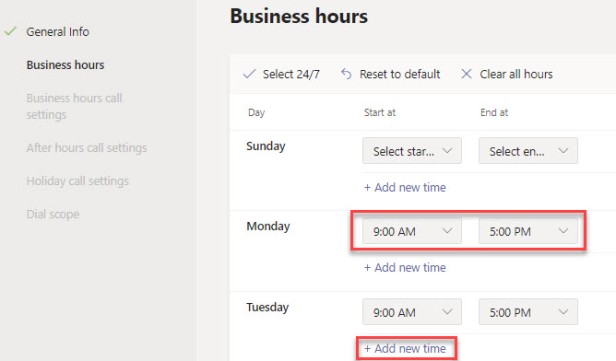
Now choose your business hours. Business hours are used in your call routing. You can have calls route one way during business hours and another, out of those hours.
You can adjust the start and end times and also add additional times to each day. For instance, maybe you’re open 9-5, but there’s a 1 hour break for lunch. Just have 9-12 and 1-5 as business hours.
Now choose your business hours settings

You might choose to have a greeting for your auto attendant. You can upload an audio file

Or you can use text to speech

Now choose a call action. You can have it go to a person or a voice app such as a call queue or another auto attendant (nested auto attendants).
With a nested auto attendant you can start with one attendant that gives choices such as sales & finance. Then if they choose sales, you ask them to choose existing order or new order.

Or you can choose a person. Maybe you want a recorded greeting to play during business hours before it goes to your front of house person. They then answer the call and transfer as needed.

Or you can create an options menu.
Start with your menu options greeting. This is what your caller will hear that can guide them through what choices they have. You can upload a recording you made earlier

Or you can use text to speech

Once you have a call prompt greeting you can choose your menu dial keys. Start with the number 0-9. Then choose your redirection option. Person or voice app
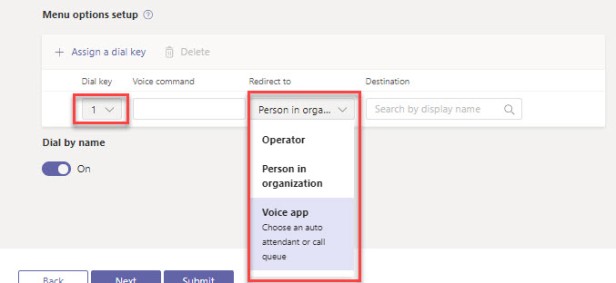
0 is reserved for your operator (the one you configured in the general screen.

And you can have choices from 1-9

Maybe you don’t have an operator. Select 1, then enter a voice command. This is the word the auto attendant will listen for in order to route the call.
Your caller can press 1 on the keypad or they can say the name of the department (great for accessibility). If you do all a voice command, it is a good idea to say this in your greeting. Such as “say sales or press 1 for the sales team”.

Now choose your destination. This can be a call queue or another auto attendant
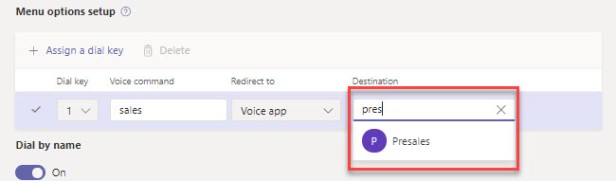
and repeat for all of your dial keys

and don’t forget the voice command

Once you have all of your dial keys, press next to go to after hours call settings.

You can choose a greeting as before and then the call action. The process is the same as business hours. You can redirect to a person, such as an on-call technician or take the caller through the out of hours menus.
One of the things that is missing right now which is especially useful for out of hours scenarios is the ability to redirect to a telephone number. If you do want to do that now, you can choose a person in your org and that person must have call forward to the number enabled. Happy to report that redirect to a number is coming soon.

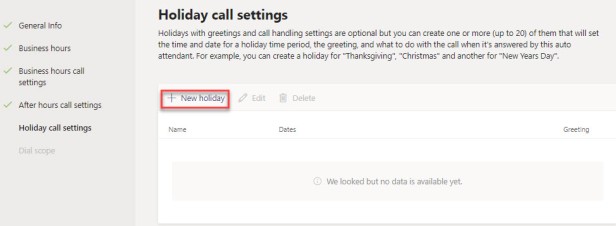
You can also set up holidays and choose what to do with callers during the holiday periods. Click new holiday
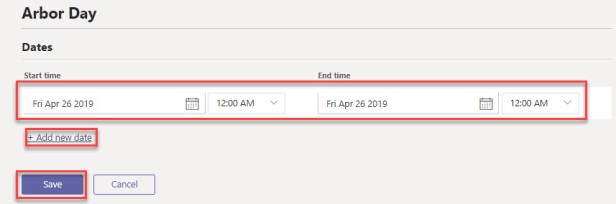
Give it a name and click create new holiday

Choose start and end dates and times and press save
Now select the holiday you created from the list

and choose a greeting. Same as before, this can be a recording or text to speech. Then choose an action. Then save

Now choose a dial scope for your directory. Remember when you were creating dial keys? And there was a toggle for dial by name? It was 3 screens ago. I’ll wait…
Back? Good. If you did enable dial by name (on by default) you can choose a dial scope. You can allow your callers to say the name of any member of staff and have the system route the call or you can limit that scope. You can include all or just the members of a group. Then you can create exclusions. In my opinion it is probably easier to create an exclusions list and group them together because that might not change as often as the inclusions list. You’d have to add each new starter to the distribution list to include them in the dial scope.
Of course if you do choose dial by name, you should say that in your greeting. e.g. “If you know the name of the person you want to speak to, say their name”. Then go on to give your menu choices.
I do think that toggle switch and this screen are too separated by the way. I know, and you know now that you’ve read this. I think the choices in this screen should just be added below the toggle. They only appear if the toggle is on.
Once you’re done with the dial scope, click submit to finish.

You now have an auto attendant, and some call queues.
Microsoft have some of their own instructions which you can find here and here.
That’s all for this one. For the next post, we move on to using PowerShell to create and customise your auto attendants and call queues. Stay tuned.
If this post or series of post or indeed any of my previous posts has been useful, why not take a moment to subscribe.
Thanks for reading!

Hey Randy, Can one rather use a Common Area Phone license bundle for an auto-attendant resource account?
LikeLike
I haven’t tried it to be honest. I’ve just been using E1 and Phone System. I suspect not, though, since Common Area Phone doesn’t include a license for Teams. Right now it is Skype for Business and Phone System. Meeting Room might be better as it includes Teams and Phone System. But it also includes Audio Conferencing which clearly isn’t needed for a resource account.
I might try F1 and Phone System and see if that works. It’s cheaper than E1 and Phone System of course. Hopefully Microsoft will release their new Resource Account license model soon. It might be an all in one license that includes everything you need. I’ve even heard that the resource account license might be free for the base license (instead of needing E1) and you just need to add Phone System as an add-on if you need to assign a number. Let’s wait and see.
Of course, if you want to try common area phone and see if it works, let me know and I’ll add it to the post and give you credit for finding out.
Thanks for reading!
LikeLike
Hi Randy, Yeah Common Area Phone now includes Teams license, Skype for Business (Plan 2) and Phone System license. It seems to work for me, please double check me. Could all be sorted in 2 weeks though…
Latest on licensing from Microsoft:
Waseem Hashem Microsoft
2019-06-07 03:11 AM
Update: Calling Plan requirement for assigning a service number to a resource is removed, roll-out is expected to be completed this week and documentation will be updated accordingly. Virtual User $0 license to replace the Phone System requirement is still on-track for July 1st.
https://techcommunity.microsoft.com/t5/Microsoft-Teams-Blog/Auto-Attendant-and-Call-Queues-Service-Update/ba-p/564521/page/3#comments
LikeLiked by 1 person
Thanks Stephen. O365 purchase services still shows Common Area Phone as Skype Online. Makes sense it also means Teams since SfBO will go at some point. That’s great that the CAP license works for Resource Accounts. Especially since it is the same price as Phone System on its own.
Interesting about the Virtual User $0 licensing. To replace Phone System? So in a couple of weeks, you won’t need a license at all for a resource account unless you want to assign it a Microsoft phone number via Calling Plans.
Can’t happen soon enough. It’s expensive funding user licenses just for a lab/practice/blog environment 😉
LikeLiked by 1 person
Hi Folks, with the Round Robin routing method does anyone know how this works? Is it reset everyday? If an agent is on DND or within a call will it still try call them?
LikeLike
Hi Randy,
you wrote “Direct Routing numbers only work for users in Teams Only mode.” Did you mean the Coexistence mode “TeamsOnly”?
By now I can say, Direct Routing numbers also work in “Islands” mode for real persons very well. But we have problems with a correctly configured and licensed ressource account. Its’ license status is “pending input” for hours now. Microsoft Support is trying to solve this.
LikeLike
Thanks Heiko. I did mean Coexistence “TeamsOnly”. I hadn’t tried it for an Islands user. I do know it persists even if you move back and forth between modes.
I’ve not had any issues like that with Resource Accounts. I take it you’re using the Phone System Virtual User license?
LikeLike
Hi Randy,
thanks. No, unfortunately not. It is one of those you described in your “How to: Assign a Direct Routing Number to an Auto Attendant or Call Queue in Microsoft Teams Phone System” with E1 + Phone System.
LikeLike
Hi Randy, I can see here that Music on hold can be loaded to this queue. That’s great but is there a way to load Music on hold can be loaded outside of the queue for the system globally so that if a call comes in outside the queue, the music on hold can be customised?
LikeLike
Music on hold is coming to Teams for DDI calls soon. It’s on the roadmap
LikeLike
Hi Randy – great post – do you know when the reporting for these call queues is coming? Users waiting, average wait time, number of calls answered by team member within the queue etc?
Thanks
Jon
LikeLike
Hi Jon,
Thank you. Microsoft is always working on enhancements to reporting and I know a lot of new stuff has come to the new CQD dashboard. There is new stuff coming, but I can’t say much if anything. Just watch this space.
LikeLike
Anyone knows when that “forward call to number”-feature will be implemented? Didn’t find anything on that roadmap.
LikeLike
I don’t have a date for it
LikeLike
Trying to add a service number for a call queue and keep getting an error even though I’ve added all the license I can think of. Any idea what license is needed to make this work?
“We cannot perform this operation because your organization is missing the required license. Click here to fix this issue.”
LikeLike
Hi Kurt,
It’s called Phone System Virtual User. You can get these from the license store for free. That’s the only license the resource account needs. See this post for details https://ucstatus.com/2019/07/05/new-license-available-for-microsoft-teams-resource-accounts/
I hope this helps
LikeLike
Thanks for the info. So I “bought” some Phone System Virtual User licenses and assigned one to my resource account but it didn’t help. I’m not even to that step yet. I’m on the Phone numbers screen, trying to add another service number because all mine are already assigned. Still getting the same error I posted above. I’ll try again tomorrow but still not sure what I’m missing.
LikeLike
You need to allow some replication time between license assignment and number assignment. Then more replication time between number assignment and a working resource account.
On occasion, if it still doesn’t work. You’ll need to log a ticket with MSFT
LikeLike
Ok found some more info. I went to the legacy portal and when I try to add a number there it says:
Total Service numbers you can acquire: 0
Amount you can reserve now: 0
I then found this https://docs.microsoft.com/en-us/microsoftteams/how-many-phone-numbers-can-you-get
I think I just need to wait until tomorrow for my newer licenses to go into effect.
LikeLike
It looks like I may have to open up a support ticket. According to the link above, I’m only allowed 5 service numbers. I’m using one for all my conference users but the other 4 also say assigned to conference bridge. When I try to change it, it says go to resource accounts but when I try to choose it on that page, no numbers show up as an option.
LikeLike
yeah, you only get a certain number of numbers per calling plan or AC license. You mentioned the legacy portal. Do the numbers not appear in the Teams Admin Centre?
LikeLike
Yes, the numbers show up under TAC Meetings , Conference bridges. These are numbers from los angeles, aurora, dallas. I don’t have them assigned to any users so not sure what the point of them is. I have one local service number and one toll free number assigned to all my conference bridge users. For testing so far I have:
Common Area Phone 2x
Communication Credits 99999x
Audio Conferencing 10x
Domestic Calling Plan 4x
Phone System 4x
Phone System Virtual User 3x
LikeLike
Yes, the numbers appear in both consoles. There’s no way to unassign them from conference bridge even though they are not in use. The new console has no option, the legacy console has a message when i hover over unassign ” default or shared numbers can’t be unassigned from the bridge. To unassign dedicated toll numbers, please contact support.” I only have the same one number assigned to all my conference bridge users so not sure why all 5 of my service numbers are set as conference bridge numbers and why they can’t be unassigned.
LikeLike
You get a certain number of numbers for each audio conferencing license you have. Up to 25 licenses, you get 5 numbers. I suspect you only have these and they have been assigned to audio conferencing. Could be wrong. Are they listed in the TAC under Meetings, Conf Bridges?
You also get numbers if you have calling plans. (N*1.1)+10 where N is the number of calling plan licenses you have. Do you have any calling plans? If not, you will only have the 5 numbers from your AC licenses.
LikeLike
Yes, the numbers show up under TAC Meetings , Conference bridges. These are numbers from los angeles, aurora, dallas. I don’t have them assigned to any users so not sure what the point of them is. I have one local service number and one toll free number assigned to all my conference bridge users. For testing so far I have:
Common Area Phone 2x
Communication Credits 99999x
Audio Conferencing 10x
Domestic Calling Plan 4x
Phone System 4x
Phone System Virtual User 3x
LikeLike
In the TAC under phone numbers you should have 5 service numbers from your AC licenses which can be assigned to either conf bridges or resource accounts. Not users. If they are assigned to something you need to unassign them before you can re-use them. Which you know. If they are listed and say service and assigned, they are assigned to something. Can you select a number and edit?
And ~14 numbers from your calling plans which can be assigned to users.
LikeLike
Under TAC Voice Phone numbers, All 5 are assigned to conference bridge. One of those is a local number that I have assigned to all my audio conference users. The other 4 are various cities which I don’t even want. I can edit but my only options are conference bridge or resource account. If I choose resource account, it says “Please go to Resource account to assign phone number to a resource account.” So I go there and try to assign a number to my resource but none appear when I start typing any of the 4 numbers.
LikeLike
By the way, the apply button is grayed out when I select resource account so my numbers are stuck as conference bridge numbers. The legacy console has an unassign button but when pressed, it says I need to contact support to unassign them.
LikeLike
I’ve been looking at this in mu tenant and I have the same issue. I have unassigned numbers that I can’t search for in the assign screen. And no way to assign in Powershell. Must be a new capability that isn’t baked fully. Raise a ticket
LikeLike
I found some PowerShell commands that worked even though these numbers weren’t defaults for any of my users. They are also from random cities so I’m not sure why I even had these numbers. I’ll probably release them eventually. The only place I’ve seen these numbers appear is on the “Local Numbers” web page where a participate could click. I would see two numbers, the shared one and mine under certain cities. Thanks for the help and this post, now I can continue.
https://docs.microsoft.com/en-us/microsoftteams/change-the-phone-numbers-on-your-audio-conferencing-bridge
Get-CsOnlineDialInConferencingBridge -Name “Conference Bridge”
Unregister-CsOnlineDialInConferencingServiceNumber -BridgeName “Conference Bridge” -RemoveDefaultServiceNumber 13315451212
LikeLike
Glad you got there in the end. Happy to help
LikeLike
Regarding auto attendants, Is there an option to add lunch break hours greetings in addition to after-hours greetings? customer needs two separate greetings for afters and lunk break.
LikeLike
You can add as many time spans to each day as you need. For instance, 9-1300, then 1400-1800. Everything outside of those hours will follow the out of hours call flow. Hope this helps
LikeLike
To have a regular lunch break message you would have to daisy chain 2 Auto-Attendants (AA):
1. AA-Main-LunchBreak, to handle lunch hour and if outside lunch hour redirect to Main AA
2. AA-Main to handle normal business hours
LikeLike
This is if you want a different action/script for lunch break than for after hours
LikeLike
Hello Randy,
I have a question for you. I have a AA and a CQ associated to that. The working hours is from 9:00 to 13:00 and 14:00 to 18:00. I have an audio file that will be played after working hours. How can I upload a second audio file for the lunch time. This is what I want: if someone calls me at 13:30 the audio file plays that says we are at lunch and come back at 14:00 and if someone calls at 19:00 the audio file plays that we are closed and come back tomorrow.
LikeLike
Is it possible to set the office hours via powershell? After the AA has been built?
LikeLike
Yes. Very long winded
LikeLike
Please can you expand upon it? I have around 100 AAs that require office hours to be applied and don’t really fancy having to do each one manually!
LikeLike
Will see what I can knock up
LikeLike