

Hello Readers,
Hope you’re well.
This post is a follow up to a couple of posts I’ve done regarding the free Skype for Business Online & Teams Network Assessment Tool by Microsoft. It seems there’s a new tool which is replacing the previous one. Its called the Skype for Business & Microsoft Teams Network Testing Companion or (TMTC for short).
The old tool had a couple of iterations. The first tool was just for Skype for Business Online and was just an executable that you could invoke using PowerShell. Just unzip, browse to the folder and run .\NetworkAssessmentTool.exe.
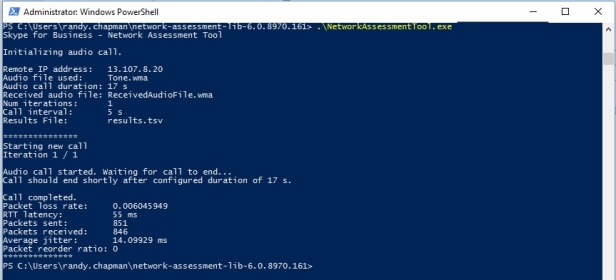
That initiated a synthetic test call to the Microsoft network edge. It saved the results of the test to a tsv file in the same directory. To look at the results you ran .\ResultsAnalyzer.exe .\results.tsv and you could see if you passed.

The updated tool was a little more sophisticated and included a test for Microsoft Teams. By this point, Microsoft started adding voice capability to Teams. This time, you installed the tool. And there were a lot more DLLs. You still ran the tool by browsing to the executable location in PowerShell and running the same command to initiate and the same command to analyze the results.
Not a great leap between the two. But at least you could run a basic network assessment from a machine on your LAN and see if the connectivity and metrics were good enough for Skype for Business or Microsoft Teams calling. Both had issues where the tool would only send 283 packets intermittently which messed up the results. In my experience, version 1.1 was more stable, but I think others still had the problem.
On with the show!
Network Testing Companion
Microsoft introduced the Network Testing Companion in February. I had it in my long list of things to test and decided to give it a go finally.
This tool couldn’t be more different to the previous one. Although I think it is doing the same thing, just in a nicer way.
The Network Testing Companion is a UI driven testing tool that performs network quality and connectivity tests. It’s hosted on the PowerShell Gallery which means you only need to install the module to have it on your PC.

You’ll need admin rights on your PC to install it. Run PowerShell as Administrator. I have it pinned to my start menu and taskbar. The easiest way is to hold down CTRL+SHIFT and click on the PowerShell shortcut. This will prompt you to run it as admin and press ok.
First run Install-Module -Name NetworkTestingCompanion
Next, run Invoke-ToolCreateShortcuts

Step one installs the module. Step two adds shortcuts to the tool to the Desktop and Start Menu.
Click on one of your shortcuts to run the tool

When the tool opens it does a pre-flight check to make sure you satisfy all the prerequisites.
- 64 bit Windows Operating System running Windows 7 or better
- Have an internet connection
- Have the Skype for Business and Teams Network Assessment Tool installed (see, I told you it was doing the same thing).
- Have a Microsoft Certified headset. This is just informational. But it is always a good to run a certified headset if you can. It’s a nice touch to show the user that they stand a good chance of having good audio quality.
As you can see below, my companion showed that I didn’t have the Assessment Tool installed. Rather than going through the steps to install it (above), it has a nice big button to start the install.

Click on install to download and install the Assessment tool

Once the install is done, you should have all green ticks on the left and a visual indicator that the tool was installed

Now click start to start a test. The tool will start to perform a test. First for connectivity

Defender should pop up to ask if you want to allow the tool to communicate on your networks. Tick the boxes you want to allow and click Allow Access

Once allowed you should get a green tick on Connectivity. Then it starts to do the quality test

The audio quality test is still just a synthetic call to the network edge. Once the test is finished, the tool starts to analyze the results

When the tool is done with the analysis, you should get a result on quality. As you can see, I passed

You can view the results to see all of the metrics of the test. I got green across the board

You can view detailed results by click on the Report icon.

The network connectivity report is a list of connection tests to all of the Relay IP Addresses in the Network Edge.
Here’s a list of endpoints you should know about for SfBO and Teams.

Next is Network quality report

This opens the results analyzer tsv file

Now you can go to the settings tab. Here you can adjust the settings.

You used to have to edit a config file to change things like number of iterations and the interval between tests

Consecutive audio tests adjusts the number of iterations. From 1 to 50 tests

You can also change the delay time between the tests from 1 to 120 seconds (2 minutes).

The timeout can be set between 90 and 190 seconds. This is the time the test will run before it times out. Perhaps if it if your first fun and you can’t tell Defender to allow access etc. The test will just time out and stop.

The about screen shows the version you’re running and where to send feedback.

Clicking on the information links on the left takes you to the MyAdvisor site.
The info link in the Network Assessment Tool takes you to the installation instructions page
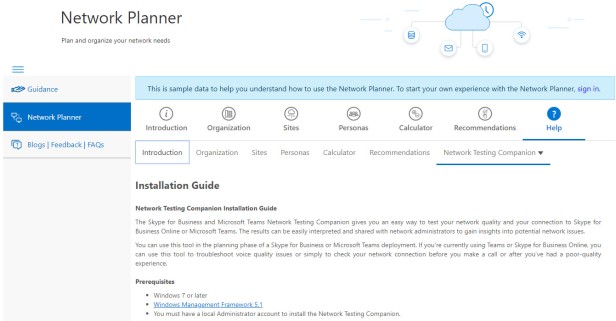
The other info links take you to the user guide page

Summary
I think you’ll agree that this UI based tool is a lot more user friendly than the old one. It does exactly the same thing as the old one, but in a much nicer and easier way.
If you’re starting a project to migrate to Microsoft Teams, you (or your partner org) should, at the very least, run this tool in each office you’ll have Teams users.
If you pass with this tool, there’s a good chance you’re good to go.
If you fail or don’t like the results, you should think about a more detailed assessment using a commercial tool from the likes or IR or Nectar. Ask your partner organization for more details.
That’s all folks!

FYI the multiple test option overwrites for each iteration of the test, so even if you run 5 tests in a row you only get the data from the last one run
LikeLike
You can open the results though to see more
LikeLike
Yes, but then what’s the point of running consecutive audio tests if you only see the results for the latest attempt.
LikeLike
Getting error “test timed out before it completed” while running the connectivity test, what might be the reason?
LikeLike
I would think it’s the permissions aspect.
LikeLike
Glad you like the tool! Let us know if you have more feedback as I’m still maintaining this repo.
LikeLiked by 1 person
Thanks Jason. Would be cool to build it into the TAC and automate and aggregate results there for analysis
LikeLike
It can’t find my Microsoft Teams or Skype-certified device?
LikeLike
for every device and connection I test i get 6 of these in the connectivity results log. DNS resolution failed for host in c-cc-asea-01.cc.skype.com/cc/v1/
LikeLike
We also encounter the same problem. don’t why.
LikeLike
The dns entries for the following appear to have been removed, Double checked with mxtoolbox, so the network connectivity test fails.
Please ensure your firewall allows connections to the following domains: *.trouter.teams.microsoft.com
DNS resolution failed for host in trouter2-cus-c.trouter.teams.microsoft.com
DNS resolution failed for host in trouter2-cus-d.trouter.teams.microsoft.com
DNS resolution failed for host in trouter2-easia-c.trouter.teams.microsoft.com
DNS resolution failed for host in trouter2-easia-d.trouter.teams.microsoft.com
DNS resolution failed for host in trouter2-eus2-c.trouter.teams.microsoft.com
DNS resolution failed for host in trouter2-eus2-d.trouter.teams.microsoft.com
DNS resolution failed for host in trouter2-weu-c.trouter.teams.microsoft.com
DNS resolution failed for host in trouter2-weu-d.trouter.teams.microsoft.com
also receiving ERROR: No data in input file. Please check that at least one record exists in results_analyzer.txt even though I have run 3 test and receive green checks on the panel.
Performance_results.tsv shows..
CallStartTime PacketLossRate RoundTripLatencyInMs PacketsSent PacketsReceived AverageJitterInMs PacketReorderRatio
6/11/2020 3:08:26 PM 0.0229226361031519 29.5 698 682 22.80057 0
LikeLike
As above , it seems that the DNS values have changed. Can the tool be updated to reflect the current correct values?
LikeLike
To be clear, this isn’t my tool. It’s from Microsoft. If it doesn’t work, the best thing to do is raise in the Docs or Github sites.
LikeLike
Unable to save shortcut “C:\Users\******\Desktop\Network Testing Companion.lnk”.
At C:\Program Files\WindowsPowerShell\Modules\NetworkTestingCompanion\1.5.5\NetworkTestingCompanion.psm1:1408 char:9
+ $Shortcut.Save()
+ ~~~~~~~~~~~~~~~~
+ CategoryInfo : OperationStopped: (:) [], DirectoryNotFoundException
+ FullyQualifiedErrorId : System.IO.DirectoryNotFoundException
Why I get this error?
LikeLike
could be admin permissions?
LikeLike
The outcome of the tests from the Network Assessment Tool is quite misleading:
Network Connectivity
—————————-
After the Network connectivity test it is reported that: “The tool was able to reach all transport relays on ALL required ports”.
For MS Teams normally this should mean that the following ports would be tested:
– tcp/443
– udp/3478
– udp/3479 (audio)
– udp/3480 (video)
– udp/3481 (sharing)
However, Wireshark captures reveal that only ports tcp/443 and udp/3478 are tested. This is also seen if the generated report is opened.
As I want to know whether an Enterprise firewall is allowing all the required ports, this test will not provide that.
Network Quality
———————
Although the outcome of this test delivers the correct Network Quality report, the session is set-up on port udp/3481 (within MS Teams this is for desktop/application sharing).
Normally I would expect this to be on port udp/3479.
LikeLike
I am local admin and get the same error as Tauri.
Powershell v6
LikeLike
Does that folder exist?
I got that error because the path to /Desktop was incorrect as my Desktop is within OneDrive.
I just created a ‘Desktop’ folder where the installer expected it to be and that fixed it.
It’s expecting Desktop to be at:
C:\Users\\Desktop
LikeLike